
There’s something about a lion that makes it one of the most requested subjects in art classes, sketchbooks, and online drawing tutorials. Maybe it’s the wild, textured mane, the intense eyes, or the sheer presence of an animal that has symbolized strength and royalty across cultures for centuries. Whatever the reason, lion drawing remains a favorite challenge for artists at every skill level, from a child sketching their first big cat to an experienced illustrator working on a detailed wildlife portrait.
If you’ve ever opened a blank page, pencil in hand, and felt unsure where to even begin with a lion’s face or mane, you’re not alone. Lions are deceptively tricky to draw well because their features rely so heavily on proportion, texture, and expression working together. This guide breaks that process down into manageable steps, explains the tools and techniques that actually make a difference, and offers practical tips you can apply whether you’re drawing a cartoon lion for a children’s book or attempting a realistic portrait in graphite. By the end, lion drawing should feel far less intimidating and a lot more enjoyable.
Why Lion Drawing Is So Popular Among Artists
Lions occupy a unique space in the world of art and illustration, appearing everywhere from ancient sculptures and heraldic crests to modern animated films and tattoo designs. This widespread cultural presence means that most people already have a strong mental image of what a lion should look like, which makes lion drawing both appealing and challenging. Artists are drawn to the animal because getting it right feels genuinely rewarding, while getting it wrong is immediately noticeable, even to viewers without formal art training.
Beyond cultural symbolism, lions also offer a fantastic subject for developing core drawing skills that transfer to other animals and subjects entirely. Practicing lion drawing helps artists build confidence with fur texture, facial symmetry, muscular anatomy, and expressive eyes, all of which are foundational skills in wildlife and portrait art more broadly. Many art teachers specifically recommend lions as a stepping stone project because mastering the mane alone teaches valuable lessons about layering, shading, and creating a sense of movement within a static image.
Essential Tools and Materials for Drawing a Lion
Before diving into technique, it helps to think about what tools actually suit the style of lion drawing you want to create. For beginners working in pencil, a simple set of graphite pencils ranging from a hard 2H for light sketching to a soft 6B for deep shading provides enough range to handle most of a lion’s tonal variety, from bright highlights on the fur to the deep shadows around the eyes and nose. A good kneaded eraser is equally important, since it allows you to lift out highlights in the mane rather than simply erasing mistakes.
For artists who prefer color, colored pencils, soft pastels, or digital drawing tablets each bring their own strengths to lion illustration. Colored pencils allow for gradual, blended layering that works beautifully for capturing the warm golden tones of a lion’s coat, while pastels can create soft, painterly fur textures with less precision but more expressive energy. Digital tools, meanwhile, offer the advantage of undo history and layer separation, making it easier to experiment with mane texture and shading without committing to permanent marks, which many beginners find less intimidating when first attempting a detailed lion drawing.
Understanding Lion Anatomy Before You Start Sketching
One of the biggest mistakes new artists make when attempting a lion drawing is jumping straight into details like fur and whiskers before understanding the underlying structure. Lions have a distinctly powerful build, with a broad chest, muscular shoulders, and a head that is proportionally large compared to the rest of the body, especially in males with a full mane. Spending even a few minutes studying reference photos to understand how the skull shape, jawline, and neck connect will make every later step of the drawing process significantly easier.
It also helps to recognize the key differences between male and female lions, since this affects both anatomy and overall silhouette. Male lions carry a thick mane that frames the face and extends down the neck and chest, which changes how you approach shading and outline compared to a lioness, whose head appears sleeker and more streamlined without that surrounding fur. Understanding these anatomical basics before sketching prevents the common problem of a lion drawing looking flat or proportionally awkward once details are added on top of a weak foundation.
Step by Step Guide to Drawing a Realistic Lion Face
Start your lion drawing with light, loose construction lines rather than committing to details immediately. Begin by sketching a rough circle for the head and a smaller oval beneath it to represent the muzzle area, using a horizontal guideline through the center of the circle to help you place the eyes symmetrically. This foundational sketch should be drawn very lightly, since these lines exist purely to guide proportion and will largely be erased or drawn over as the piece develops.
Once your basic shapes are in place, begin refining the facial features one at a time, starting with the eyes, since they anchor the entire expression of the drawing. Lion eyes tend to sit relatively close together and slightly angled, with a strong brow ridge above them that gives the face its intense, watchful expression. After placing the eyes, move on to the nose and mouth, keeping proportions in mind: a lion’s nose is broad and slightly triangular, sitting directly above a wide mouth line that curves gently at the corners.
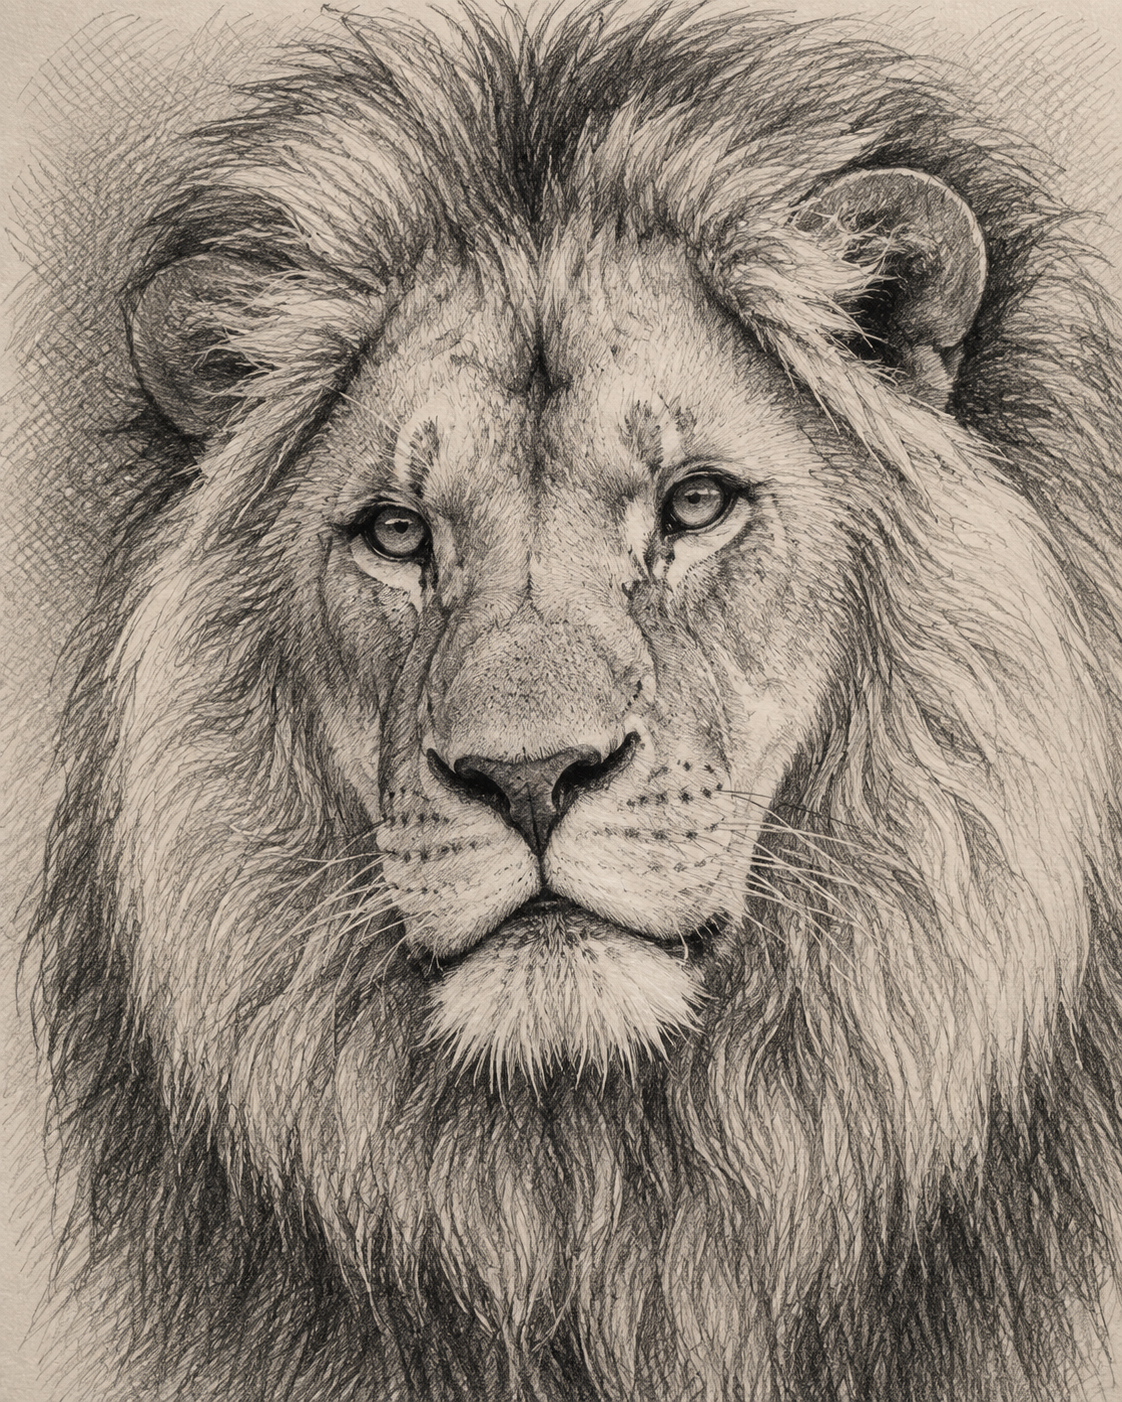
With the core features established, shift your attention to the mane, which is often what makes or breaks a convincing lion drawing. Rather than drawing individual hairs from the very start, block in the overall shape and flow of the mane using loose, directional strokes that follow how fur naturally grows outward and downward from the head. Building up texture gradually, working from larger clumps of fur down to finer individual strands, produces a far more realistic result than attempting to draw every hair in isolation from the beginning.
Finally, focus on shading to bring depth and dimension to your lion drawing. Identify your light source early and stay consistent with it throughout the piece, adding darker values beneath the brow, around the nose, and within the recesses of the mane, while leaving lighter areas where light naturally hits the fur and facial planes. Blending these values smoothly, whether with a blending stump for pencil work or soft brushes in digital art, is what ultimately gives the drawing its lifelike, three-dimensional quality.
How to Draw a Simple Cartoon Lion for Beginners
Not every lion drawing needs to aim for photorealism, and cartoon-style lions remain hugely popular for children’s books, logos, and casual sketching. To draw a simple cartoon lion, start with a large circle for the head and a slightly smaller circle for the body, keeping proportions playful and exaggerated rather than anatomically precise. Cartoon lions often feature oversized eyes and a simplified mane made up of soft, rounded shapes rather than individual fur strands, which makes this style far more forgiving for beginners.
Once the basic shapes are drawn, add simplified facial features using clean, confident lines rather than sketchy, uncertain strokes, since cartoon art generally reads better with bold, deliberate linework. The mane can be represented with a series of connected scalloped or wavy shapes surrounding the head, giving the impression of fur volume without requiring detailed shading. This approach is particularly popular among parents, teachers, and hobbyist artists looking for a fun, low-pressure project that still produces a recognizable and charming result.
Common Mistakes to Avoid When Drawing a Lion
Even experienced artists occasionally fall into predictable traps when working on a lion drawing, and recognizing these mistakes ahead of time can save considerable frustration. One of the most frequent issues is drawing the mane as a uniform, cloud-like shape rather than paying attention to how fur naturally flows and clumps together, which results in a mane that looks stiff or artificial rather than soft and voluminous. Studying reference images of real lions, or even close-up photography of the mane specifically, helps artists understand this natural texture far better than working from memory alone.
Another common mistake involves rushing the eyes and expression before establishing solid proportions elsewhere on the face. Because the eyes carry so much emotional weight in any animal portrait, artists sometimes overinvest time there while neglecting the surrounding structure, resulting in a face that feels unbalanced once the drawing is complete. Taking the time to build a strong, well-proportioned foundation before adding fine detail consistently produces stronger results, regardless of whether you’re working on a realistic or stylized piece.
Tips for Adding Texture and Realism to Fur and Mane
Achieving convincing fur texture is often the single biggest challenge in lion drawing, but a few core techniques make a substantial difference. Working in layers, rather than trying to achieve final texture in a single pass, allows you to build up depth gradually, starting with a soft base layer of shading and then adding individual fur strokes on top using a sharper pencil or fine brush. This layered approach mimics how fur actually appears in nature, with darker undertones visible beneath lighter, more defined top strands.
Varying the length, direction, and pressure of your strokes also adds significant realism to a lion drawing, since real fur rarely grows in perfectly uniform patterns. Around the face and jawline, shorter, tighter strokes tend to work best, while the mane itself benefits from longer, more flowing lines that curve naturally around the head and shoulders. Paying close attention to how fur catches light, particularly along the top of the head and shoulders where a lion typically receives the most direct sunlight in its natural habitat, helps create believable highlights that make the entire piece feel more three-dimensional.
Using Reference Photos Effectively Without Losing Originality
Reference photos are an essential tool for any artist attempting a detailed lion drawing, but knowing how to use them properly makes a significant difference in the final result. Rather than copying a single photo stroke for stroke, many experienced artists study multiple references to understand general anatomy, fur patterns, and lighting behavior, then combine that understanding into an original composition rather than a direct reproduction. This approach respects the creative process while still grounding the drawing in accurate, believable anatomy.
It’s also worth paying attention to lighting conditions across your reference material, since inconsistent light sources between multiple photos can lead to confusing, contradictory shadows if you’re not careful. Choosing references that share similar lighting, or mentally adjusting for consistency as you draw, helps maintain a cohesive look throughout the piece. Many artists keep a folder of favorite reference images organized by feature, such as separate images focused on eyes, mane texture, and paw structure, making it easier to cross-reference specific details without constantly searching for new material mid-drawing.
Digital vs Traditional Methods for Lion Drawing
Both digital and traditional methods offer distinct advantages depending on your goals and working style. Traditional media, such as graphite, charcoal, or colored pencil, offers a tactile, hands-on process that many artists find more meditative and satisfying, along with the appeal of having a physical finished piece to display or gift. However, traditional lion drawing also comes with less room for error, since major mistakes in ink or heavily blended graphite can be difficult to fully correct.
Digital drawing, on the other hand, offers significant flexibility through features like layers, undo history, and adjustable brush settings that mimic traditional textures while allowing for easy experimentation. This makes digital tools particularly appealing for beginners still building confidence with proportion and shading, since mistakes can be corrected without starting over entirely. Many professional wildlife illustrators actually use a hybrid approach, sketching initial concepts traditionally before refining and coloring the final piece digitally, combining the strengths of both methods.
Lion Drawing Ideas and Styles to Explore
Once you’ve built confidence with basic anatomy and technique, exploring different styles can keep the subject feeling fresh and creatively engaging. A tightly rendered, hyperrealistic lion portrait focused entirely on the face and mane remains one of the most popular approaches, often used in wildlife art competitions and gallery pieces. Alternatively, a full-body lion drawing captured mid-stride or resting in tall grass offers an opportunity to practice anatomy and composition together in a more dynamic, storytelling context.
For artists drawn to more expressive or symbolic work, stylized approaches such as geometric line-art lions, watercolor washes emphasizing loose color over precise detail, or tribal-inspired designs offer a completely different creative direction while still centering on the same core subject. Silhouette-style lion drawings, often used in logo design and branding, strip the subject down to its most iconic shape, requiring careful attention to outline and negative space rather than internal detail. Experimenting across these different styles not only keeps practice sessions interesting but also strengthens overall versatility as an artist.
How to Practice and Improve Your Lion Drawing Skills Over Time
Like any specific drawing subject, meaningful improvement comes primarily through consistent, focused practice rather than occasional attempts. Setting aside regular time to work specifically on individual elements, such as eyes one session and mane texture the next, allows for more targeted skill development than attempting a full, detailed drawing every single time. Many artists find that keeping a dedicated sketchbook section for these studies helps track visible progress over weeks and months, which can be genuinely motivating during the inevitable plateaus that come with learning any new skill.
Seeking feedback, whether from art teachers, online communities, or simply comparing your work against reference material with a critical eye, also accelerates improvement considerably. It helps to periodically revisit earlier attempts to honestly assess which specific elements, whether proportion, shading, or fur texture, still need the most attention. Combining this kind of self-reflection with continued exposure to other artists’ work, through tutorials, galleries, or wildlife photography, provides ongoing inspiration and a clearer sense of the techniques worth incorporating into your own evolving style.
Frequently Asked Questions About Lion Drawing
What is the easiest way to start a lion drawing as a complete beginner?
Starting with basic geometric shapes, such as circles and ovals for the head and muzzle, provides a simple foundation that doesn’t require advanced anatomy knowledge. Cartoon-style lion drawing is also an excellent entry point, since it relies on simplified, forgiving shapes rather than precise realistic proportions.
How long does it typically take to complete a detailed lion drawing?
The time required varies significantly based on skill level, medium, and level of detail, ranging anywhere from thirty minutes for a simple sketch to several hours or more for a highly detailed, shaded portrait. Beginners should expect their early attempts to take longer as they work through unfamiliar proportions and techniques.
What pencils are best for shading a realistic lion mane?
A range of graphite pencils, typically from 2H through 6B, offers enough tonal variety to capture both the lightest highlights and darkest shadows found within a lion’s mane. Softer pencils in the 4B to 6B range are particularly useful for building deep, rich shadow areas within the thickest parts of the fur.
How can I make my lion drawing look more realistic instead of flat?
Focusing on consistent light source direction, layered shading, and varied fur stroke texture are the most effective ways to add dimension and realism. Studying reference photos closely, particularly for how light interacts with fur and muscle structure, also significantly improves the overall sense of depth.
Is it better to learn lion drawing through video tutorials or books?
Both formats offer value, though video tutorials tend to be more effective for beginners since they show the actual stroke-by-stroke process in real time rather than relying on static images. Books and printed guides remain useful as reference material once you already understand the basic techniques being demonstrated.
Can I draw a lion without using reference photos?
While experienced artists sometimes draw from memory after extensive practice, beginners are strongly encouraged to use reference photos, since lion anatomy includes specific proportions and details that are difficult to accurately recall without visual guidance. Over time, repeated practice with references naturally builds the memory and intuition needed to draw more freely.
What is the hardest part of drawing a lion for most artists?
Most artists find the mane to be the most challenging element, since achieving natural, flowing fur texture requires careful attention to layering, direction, and shading rather than simply outlining a general shape. The eyes are also frequently cited as difficult, given how much they influence the overall expression and believability of the finished piece.